Booth Ready: A Cricut Maker's Honest Guide to Surviving (and Profiting From) Your First Craft Fair
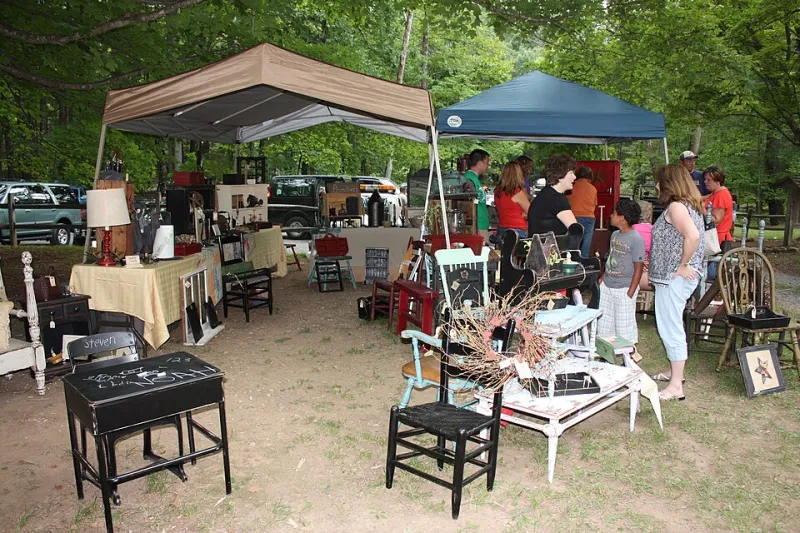
Photo: Virginia State Parks staff, CC BY 2.0, via Wikimedia Commons
There's a moment every Cricut maker hits where the Etsy shop feels like enough — and then suddenly it doesn't. You want to meet your customers. You want to see someone pick up your product and smile. You want the full small-business experience. And so you sign up for a craft fair.
Then the panic sets in.
How much stuff do you bring? How do you price it? What does the booth actually cost to set up? Will you make any money, or will you break even on a really exhausting Saturday?
This guide is for the maker who's been there — staring at a blank spreadsheet at 11pm, two weeks before a holiday market, wondering if they made a huge mistake. Let's walk through this together, from the first planning steps all the way to packing up your car on show day.
Step One: Picking the Right Event for a First Timer
Not all craft fairs are created equal, and your first one shouldn't be a 3-day regional juried show with a $400 booth fee. Start smaller and smarter.
Local community markets (farmers markets with a craft section, neighborhood festivals, church bazaars) typically charge $25–$75 for a booth space and draw a casual, browsing crowd. The pressure is lower, the investment is lower, and you'll learn an enormous amount about what sells.
Holiday craft fairs — especially school or church-hosted ones held in November and December — are often goldmines for Cricut makers. Personalized ornaments, custom stockings, and gift-ready items move fast in these environments. Booth fees range from $50–$150 for a single day.
Regional juried shows can be lucrative but require an application process, a more polished booth presentation, and higher upfront costs. Save these for year two once you know your bestsellers and have your setup dialed in.
The Timeline: What to Do and When
If you've got 6–8 weeks before your first fair, here's a rough roadmap:
6–8 weeks out:
- Confirm your booth registration and pay your fee
- Audit your current inventory and identify your top 5–8 product categories
- Order any materials you're running low on — vinyl, cardstock, blanks, packaging supplies
- Start producing inventory in batches (more on quantities below)
3–4 weeks out:
- Design and order your signage (your business name display, pricing signs, any branded elements)
- Source your display fixtures: risers, grid walls, tablecloths, hangers, baskets, small shelving
- Set up a Square, Venmo, or PayPal account if you don't have one — most shoppers won't carry cash
1–2 weeks out:
- Do a mock booth setup in your living room or garage. Seriously, do this.
- Price every single item before the day of the show
- Prepare your change fund (at least $100 in small bills if you're accepting cash)
- Pack a day-of kit: scissors, extra tape, a sharpie, phone charger, snacks, and a chair
Day before:
- Load your car strategically — heaviest items in first
- Confirm your setup time with the event organizer
- Get good sleep (you'll thank yourself)
Booth Setup Costs: The Real Numbers
Let's talk money. Here's a realistic breakdown of what you might spend getting your first booth off the ground:
| Item | Estimated Cost |
|---|---|
| Booth registration fee | $50–$150 |
| 6-foot folding table (if you don't own one) | $40–$70 |
| Tablecloth | $10–$20 |
| Tent/canopy (for outdoor events) | $80–$200 |
| Display risers, stands, grid walls | $30–$100 |
| Signage (printed banner or custom sign) | $20–$60 |
| Pricing tags and labels | $5–$15 |
| Bags and packaging for purchases | $15–$30 |
| Card reader (Square basic is free, but dongles vary) | $0–$50 |
| Total first-time setup | $250–$695 |
The good news: most of this is a one-time cost. Your tent, table, and display fixtures travel with you to every future event. Over time, your per-event overhead drops significantly.
What Actually Sells at Craft Fairs (And What Doesn't)
This is where a lot of first-timers get surprised. The products you pour the most love into aren't always the ones that fly off the table.
Strong sellers for Cricut makers:
- Personalized items (name ornaments, monogrammed tote bags, custom keychains) — people love seeing their name on something
- Low-price-point impulse buys ($5–$15 items) — stickers, small decals, bookmarks
- Seasonal and occasion-specific items — whatever holiday or season the fair falls near
- Gift-ready products — things that are already packaged and feel like a complete gift
Slower movers at fairs:
- Large statement pieces that require explanation
- Items priced above $50 (shoppers at community fairs are often in browsing mode, not big-purchase mode)
- Products that only appeal to a narrow demographic
A good rule of thumb: bring a mix of price points. You want something at every tier — $5, $15, $25, and maybe one or two $40+ items for the shoppers who are ready to splurge.
Pricing Strategy for the Booth Environment
Fair pricing is slightly different from Etsy pricing because your costs are different. You have booth fees, travel costs, and your time loading, setting up, selling, and breaking down. Factor all of that in.
A simple formula: (Materials cost x 3) + a portion of your booth overhead per item. If you're bringing 100 items to a fair with a $100 booth fee, that's $1 per item in overhead — before your time.
Also: round your prices. $12 sells better than $11.50 at a fair. People are handing over cash and making quick decisions. Clean numbers help.
Honest Revenue Expectations
First-time makers often expect to walk away from a craft fair with a big payday. Sometimes that happens. More often, here's what's realistic:
- Small local market (4–6 hours): $150–$400 in sales
- Holiday craft fair (full day): $300–$800 in sales
- Regional show (multi-day): $500–$2,000+ in sales
After subtracting materials, booth fees, and overhead, your first fair might net you $50–$200 profit. That might feel underwhelming — but you're also getting customer feedback, building local brand recognition, and learning what to make more of next time. That intel is genuinely valuable.
Your First Fair Checklist
- Booth registration confirmed and paid
- Inventory produced and priced
- Display fixtures purchased or borrowed
- Signage ready
- Payment processing set up
- Change fund prepared
- Mock booth setup done
- Day-of kit packed
- Car loaded night before
- Business cards or a QR code to your online shop — so fair browsers can become future customers
Your first craft fair won't be perfect. You'll forget something, you'll misjudge what to bring, and you'll drive home exhausted. You'll also probably have a few conversations with customers that remind you exactly why you started making things in the first place. That part? Completely worth it.